TensorFlow
数据结构
Tensor
操作间传递的数据的数据结构都是Tensor,内部可以看作储存了一个N维的数组(类似于Numpy.ndarray)。 Rank, Shape, 和 Type.
x.name         # 'input:0'
x.valaue_index # 0
x.op.name      # 'input'
创建变量
当训练模型时,用变量来存储和更新参数。变量的初始值可以为Numpy数组或tensorflow提供的初始化方法(tf.zeros、tf.random_normal等)生成。
state = tf.Variable(0, name="counter")
biases = tf.Variable(tf.zeros([200]), name="biases", dtype=tf.int32)
weights = tf.Variable(tf.random_normal([784, 200], stddev=0.35),name="weights")
tf.Variable操作储存初始值以及相关信息(例如name)。变量类型至关重要,不同类型的变量无法进行运算。
常量
one = tf.constant(1)
计算图
TensorFlow将耗时计算任务完全运行在Python外部,通过计算图来描述各计算任务(Operation)间的交互。因此Python代码的目的是用来构建这个可以在外部运行的计算图,以及安排计算图的哪一部分应该被运行。
变量的初始化必须在模型的其它操作运行之前先明确地完成。
# 在计算图启动之后,变量必须先经过`初始化` 操作初始化
# 事先定义初始化操作:
init_op = tf.initialize_all_variables()
with tf.Session() as sess:
    sess.run(init_op)  # Run the init operation.
    # Use the model
tf.initialize_all_variables()函数便捷地添加一个操作来初始化模型的所有变量。你也可以给它传入一组变量进行初始化。(事实上是一个tf.assign操作)
有时候会需要用另一个变量的初始化值给当前变量初始化,而tf.initialize_all_variables()是并行地初始化所有变量,所以在有这种需求的情况下需要小心。用其它变量的值初始化一个新的变量时,使用其它变量的initialized_value()属性。
激活函数
内置激活函数定义在tensorflow.keras.activations模块中,可使用激活函数的函数名或函数对象作为activation参数的值。函数名会由tensorflow.keras.activations.deserialize()方法(或get())转换为函数对象。
Session
Tensorflow依赖于一个高效的C++后端来进行计算。与后端的这个连接叫做session。一般而言,使用TensorFlow程序的流程是先创建一个图,然后在session中启动它。
import tensorflow as tf
sess = tf.Session()
result = sess.run(graph)
sess.close()

with tf.Session() as sess:
    [with tf.device("/gpu:1"):]
        result = sess.run(result)
管理多个图
取回结果
可以在使用Session对象的run()调用 执行图时, 传入一些 tensor, 这些 tensor 会帮助你取回结果。
Feed
input1 = tf.placeholder(tf.types.float32)
input2 = tf.placeholder(tf.types.float32)
output = tf.mul(input1, input2)
with tf.Session() as sess:
  print sess.run([output], feed_dict={input1:[7.], input2:[2.]})
InteractiveSession
InteractiveSession让你在运行图的时候,插入一些计算图,这些计算图是由某些操作(operations)构成的。
如果你没有使用InteractiveSession,那么你需要在启动session之前构建整个计算图,然后启动该计算图。
import tensorflow as tf
sess = tf.InteractiveSession()
x = tf.Variable([1.0, 2.0])
a = tf.constant([3.0, 3.0])
x.initializer.run()
sub = tf.sub(x, a)
使用GPU计算
devs = tf.config.list_physical_devices()  # 列出计算设备,包括CPU、GPU
with tf.device(devs[0].name.replace('physical_device:','')):
   # 构建计算图
设备名称形如'/physical_device:CPU:0',而tf.device只需要'/CPU:0' 。
构建模型
权重初始化
Weight initialization is a procedure to set the weights of a neural network to small random values that define the starting point for the optimization (learning or training) of the neural network model.
We cannot initialize all weights to the value 0.0 as the optimization algorithm results in some asymmetry in the error gradient to begin searching effectively.
Weight Initialization for Deep Learning Neural Networks (machinelearningmastery.com)
训练
We run a machine learning “algorithm” on a dataset to get a machine learning “model.”
- Algorithm: Procedure run on data that results in a model (e.g. training or learning).
- Model: Data structure and coefficients used to make predictions on data.
Stochastic machine learning algorithms use randomness during learning, ensuring a different model is trained each run.
- Initialization, such as weights.
- Regularization, such as dropout.
- Layers, such as word embedding.
- Optimization, such as stochastic optimization.
Why Do I Get Different Results Each Time in Machine Learning? (machinelearningmastery.com)
The random initialization allows the network to learn a good approximation for the function being learned. Nevertheless, there are times when you need the exact same result every time the same network is trained on the same data. Such as for a tutorial, or perhaps operationally.
Seed the Random Number Generator
Random number generators require a seed to kick off the process, and it is common to use the current time in milliseconds as the default in most implementations.
from numpy.random import seed
seed(1)
from tensorflow import set_random_seed
set_random_seed(2)
This is a best practice because it is possible that some randomness is used when various Keras or Theano (or other) libraries are imported as part of their initialization, even before they are directly used.
Keras
Keras库结构:
-
models:包括神经网络模型的定义,例如
Sequential。from keras.models import Sequential -
layers:神经网络各层的模型定义,例如
Dense。from keras.layers import Dense model.layers # 获取模型中各层对象。
模型类
Sequential
层类
输入
Input类:限定模型的输入维度。
input=Input(shape=, batch_shape=, name=, dtype=, sparse=, tensor=)
当模型仅包含输入层时,模型不包含任何可训练参数(权重矩阵和偏置);训练参数位于两层之间。使用model.summary()可查看层定义、输出维数以及参数数量,使用model.inputs, model.outputs查看整个模型的输入输出维数。
预处理
Working with preprocessing layers | TensorFlow Core
Normalization
Dense
layer = Dense(
    units,                     # 计算单元数量(输出数量)
    activation=None,           # 激活函数,不指定则直接输出
    use_bias=True,             # 是否添加偏置
    bias_initializer="zeros",  # 偏置向量初始化函数
    kernel_initializer="glorot_uniform", # 权重矩阵初始化方法
    **kwargs
)
其他参数kernel_regularizer, bias_regularizer, activity_regularizer, kernel_constraint, bias_constraint。
模型参数数量:(num_input+1)*units,每个计算单元对应一组权重和一个偏置:$\mathbf{y}=\mathbf{Wx}+\mathbf{b}$;
Conv2D
2D卷积层:创建卷积核与输入数据进行运算($\mathbf{y}=\mathbf{wx}+b$)。
layer = Conv2D(
   filters,         # 每个输入通道的卷积核数量(对应输出图像的数量)
   kernel_size,     # 卷积核大小
   strides=(1, 1),  # 卷积滑动的步长
   padding='valid', # 边缘填充,"valid"不填充,"same"填充0
   data_format="channels_last",
   input_shape=(28,28,3),               # 28*28 RGB image
   activation=None, use_bias=True, bias_initializer='zeros',
   kernel_initializer='glorot_uniform', # 卷积核(权重矩阵)初始化函数
   **kwargs) -> None
data_format:输入数据格式,数据中RGB通道的表示方式:channels_last->(batch_size, height, width, channels);channels_first->(batch_size, channels, height, width);
input_shape:当作为输入层时,使用此参数指定输入数据样本的维数(对应data_format去掉batch_size)。
其他参数:
dilation_rate, groups,
输出维数:
channels_last->(batch_size, new_rows, new_cols, filters);channels_first->(batch_size, filters, new_rows, new_cols);
MaxPooling2D
UpSampling2D
构建编译模型
构建模型
顺序式构建:创建Sequential对象,并使用model.add(layer)方法逐次添加层。
from tf.keras import Input,Model
from tf.keras.layers import Dense
model = tf.keras.Sequential()
model.add(Dense(8, input_shape=(16,)))
model.add(Dense(4))                    # automatic shape inference
input_shape参数用于限定模型的输入数据维数,等效于首先添加Input(shape=(16,));如果未指定输入维数,则会在训练时根据输入维数确定输入层到第一层的权重矩阵维数。
函数式API:将每层对象视为函数,将前一层的输出作为该层的输入;最后使用输入和最后的输出构建模型,通过输入输出关系构建整个网络。
inputs = Input(shape=(3,))
x = Dense(4, activation=tf.nn.relu)(inputs)
outputs = Dense(5, activation=tf.nn.softmax)(x)
model = Model(inputs=inputs, outputs=outputs)
配置Keras模型
model.compile(
    optimizer="rmsprop",   # 优化算法
    loss=None,             # 损失函数
    metrics=None,          # 性能度量函数,如accuracy,mse
    loss_weights=None,
    weighted_metrics=None,
    **kwargs
)
损失函数;
训练模型
fit()
ModelCheckpointcallback is used in conjunction with training usingmodel.fit()to save a model or weights (in a checkpoint file) at some interval, so the model or weights can be loaded later to continue the training from the state saved.
自定义模型组件
自定义模型
class CustomModel(keras.Model):
  def get_config(self):
    return {"hidden_units": self.hidden_units}
  @classmethod
  def from_config(cls, config):
    return cls(**config)
自定义模型的导入导出:需要定义get_config()方法用于导出自定义类型的参数,from_config用于正确初始化模型和层对象。
自定义层
class CustomLayer(keras.Layer):
  pass
Making new Layers and Models via subclassing | TensorFlow Core
常见问题
序列化数据和模型
保存TensorFlow模型
Protocol Buffers
保存和加载计算图
The GraphDef class is an object created by the ProtoBuf library. After you've created a TensorFlow Graph object, you can save it out by calling as_graph_def(), which returns a GraphDef object.
保存GraphDef。
tf.io.write_graph(
    graph_or_graph_def, # A Graph or a GraphDef protocol buffer.
    logdir, # Directory where to write the graph
    name,	# file name
    as_text=True # By default, writes as an ASCII proto
)
Text and Binary Formats
Text Format is a human-readable form, which makes it nice for debugging and editing, but can get large when there's numerical data like weights stored in it.
Binary format files are a lot smaller than their text equivalents, even though they're not as readable.
f.write(graph_def.SerializeToString())  # save as binary
graph_def.ParseFromString(f.read())     # read from binary
保存和加载变量
保存变量
saver = tf.train.Saver()
with tf.Session() as sess:
  sess.run(init_op)
  # Do some work with the model.
  # Save the variables to disk.
  save_path = saver.save(sess, "/tmp/model.ckpt")
  print("Model saved in path: %s" % save_path)
默认保存全部变量。在创建Saver对象时指定要保存的变量,可以创建多个Saver对象以保存不同分组的变量。
# Add ops to save and restore only `v2` using the name "v2"
saver = tf.train.Saver({"v2": v2})
恢复变量
恢复变量时无需执行初始化操作。如果只是恢复部分变量,那么需要在会话开始前初始化其他变量。
saver = tf.train.Saver()
# Later, launch the model
with tf.Session() as sess:
	# Restore variables from disk.
	saver.restore(sess, "/tmp/model.ckpt")
    # do some work with the model
保存和加载模型
simple_save:模型(*.pb)和变量(/variables)分别输出(等效于使用Saver.save+tf.io.write)。
tf.saved_model.simple_save(
    session,
    export_dir,
    inputs,		// providing names for model's inputs
    outputs,	// providing names for model's outputs
    legacy_init_op=None
)
检查保存后的模型:
saved_model_cli show --dir {export_path} --all
Serve your model with TensorFlow Serving
https://www.tensorflow.org/tfx/tutorials/serving/rest_simple#serve_your_model_with_tensorflow_serving
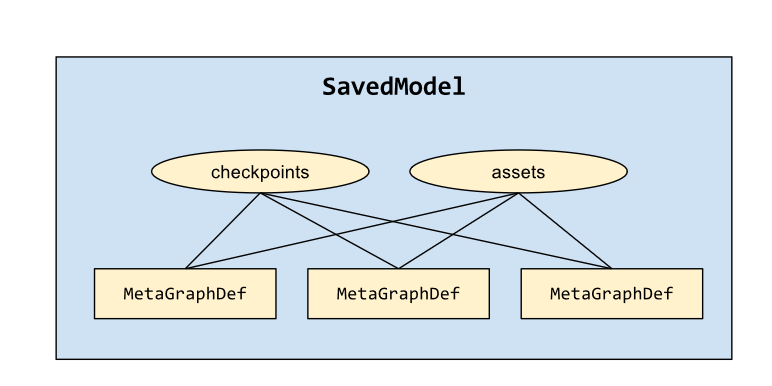
SavedModel
builder = tf.saved_model.builder.SavedModelBuilder(export_dir)
builder.add_meta_graph_and_variables
builder.add_meta_graph
A MetaGraph is a dataflow graph, plus its associated variables, assets, and signatures.
A MetaGraphDef is the protocol buffer representation of a MetaGraph.
A signature is the set of inputs to and outputs from a graph.
tf.saved_model.loader.load
Estimators自动保存和恢复变量。
Export
Freezing
The weights usually aren't stored inside the file format during training. Instead, they're held in separate checkpoint files, and there are Variable ops in the graph that load the latest values when they're initialized.
==there's the freeze_graph.py script that takes a graph definition and a set of checkpoints and freezes them together into a single file.==
tensorflow.python.tools.freeze_graph.freeze_graph(...)
freeze_graph调用以下方法将图中的变量(权重)转换为常量:
tf.graph_util.convert_variables_to_constants(
    sess,             # Active TensorFlow session
    input_graph_def,  # GraphDef object holding the network
    output_node_names, # List of node names for the result graph.
    variable_names_whitelist=None,
    variable_names_blacklist=None
)# Warning: deprecated
将图中的变量全部替换为常量,使得图能够以单一
GraphDef对象被导出保存,同时也移除了关于加载和保存变量的操作。 默认转换所有变量(variable_names_whitelist=None)。 返回:GraphDef对象。
导入导出Keras模型
Keras模型包括:
- 架构,即该模型所包含的层及其连接关系配置;
- 权重值集合,即模型的状态;
- 优化器(通过编译模型定义);
- 损失度量指标(通过编译模型、调用
add_loss()或add_metric()定义)。
Keras支持将上述所有信息一次性保存(SaveModel或H5格式),或选择其中部分保存(如使用JSON格式保存架构)。
导入导出完整模型数据
from tensorflow import keras
model.save(filepath,overwrite=True,include_optimizer=True,
    save_format=None,  # 'tf'(tf2.x) or 'h5'(tf1.x)
) # signatures=None, options=None, save_traces=True,
keras.models.save_model(model,...)  # --> Model.save()
SaveModel导出数据为一个文件夹,其中模型架构、训练配置(包括优化器、损失和度量指标)保存在saved_model.pb中,训练权重保存在variabes/目录下。相比之下,H5格式为单个HDF5文件,且不包含外部添加(add_loss()或add_metric())的损失和度量指标(需要在加载模型时重新添加),不包含自定义类的计算图(需要在加载时通过这些对象的代码重构模型)。
如果某种序列化方式不能存储自定义模型或层的Python字节码,则加载时需要通过custom_objects参数来指定这些对象类型的名称和类名映射。如果目标平台无法导入自定义代码,则可以使用pickle等方法导入导出自定义类型的代码数据(不安全且存在兼容性问题)。
save_traces=True[tf2.4]:在没有自定义类型的定义代码情况下也能加载模型;否则,自定义对象必须定义get_config/from_config方法,并在加载时通过custom_objects传递的类型定义进行初始化。
加载模型:
keras.models.load_model(filepath, custom_objects=None) # compile=True, options=None
导入导出模型结构和权重
将模型架构导出为Python字典或JSON文本,其中包含了各层的类型、参数定义与连接关系。
config:dict = model.get_config() # the configuration of the model.
Sequential.from_config(config)   # Model.from_config(config)
config:str = model.to_json() # not include the weights, only the architecture.
model = keras.models.model_from_json()  # recover the model
等效API:
tf.keras.models.model_to_json()。YAML格式:
model.to_yaml()和keras.models.model_from_yaml()。
导入导出模型权重参数:
model.get_weights()  # A list of all weight tensors in the model, as Numpy arrays.
model.save_weights() # saves the weights of the model as a HDF5 file.
model.load_weights() # the architecture is expected to be unchanged.
model.set_weights()  # same shape as get_weights()
此外,还可以调用层对象的方法获取层的权重值,适用于迁移学习中权重系数迁移。
加载完模型架构和参数后,需要调用model.compile()重新编译模型(和最初构建时的编译配置相同)。
Saving & loading only the model's weights values
应用示例
SoftMAX模型
数据集介绍
MINST(Modified National Institute of Standards and Technology)数据集。
训练数据集mnist.train.images
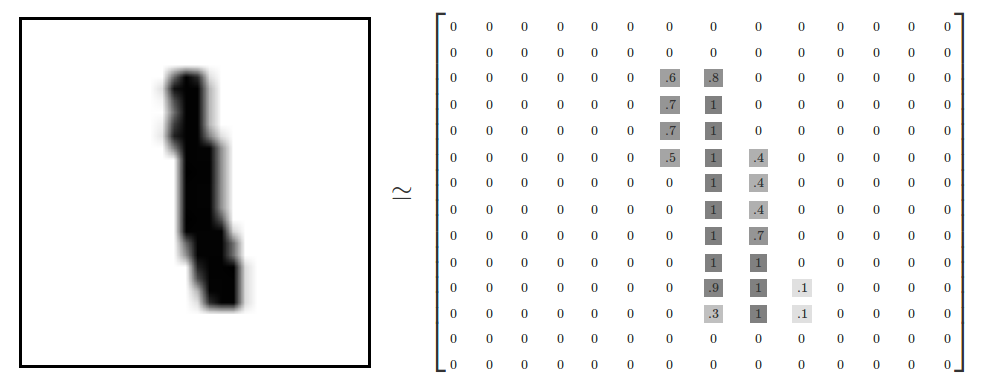
mnist.train.images是一个形状为[60000, 784]的张量
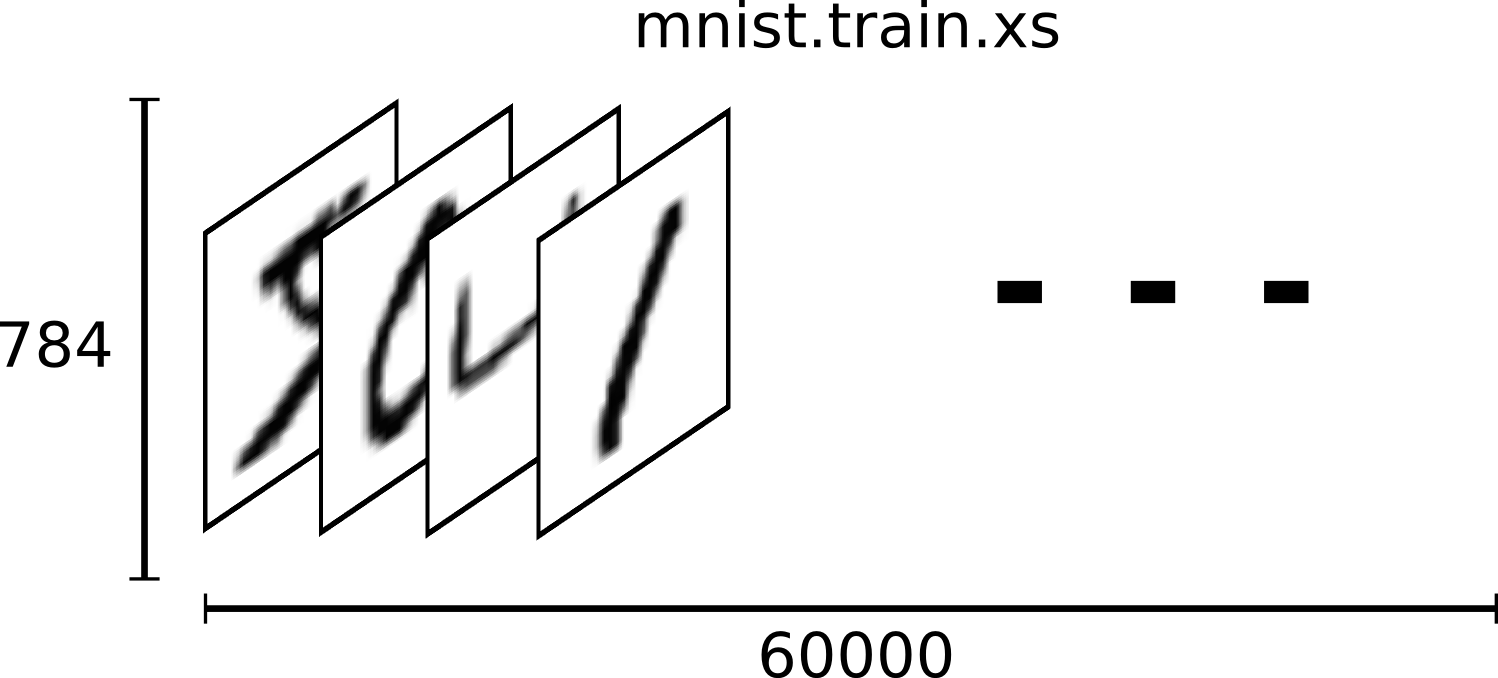
每一张图片包含$28\times28$像素。
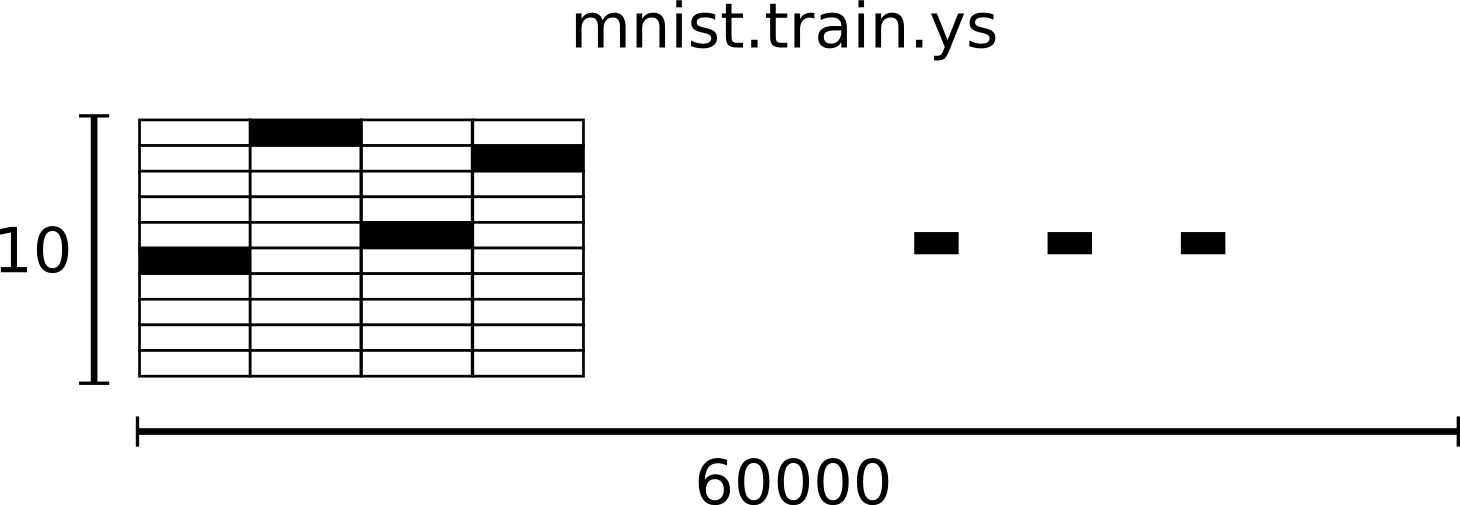
训练数据集标签mnist.train.labels是一个 [60000, 10] 的数字矩阵。
Softmax Regression
给定图片代表每个数字的概率。
为了得到一张给定图片属于某个特定数字类的证据(evidence),我们对图片像素值进行加权求和。如果这个像素具有很强的证据说明这张图片不属于该类,那么相应的权值低,相反如果这个像素拥有有利的证据支持这张图片属于这个类,对应权值高。
我们也需要加入一个额外的偏置量(bias),因为输入往往会带有一些无关的干扰量。
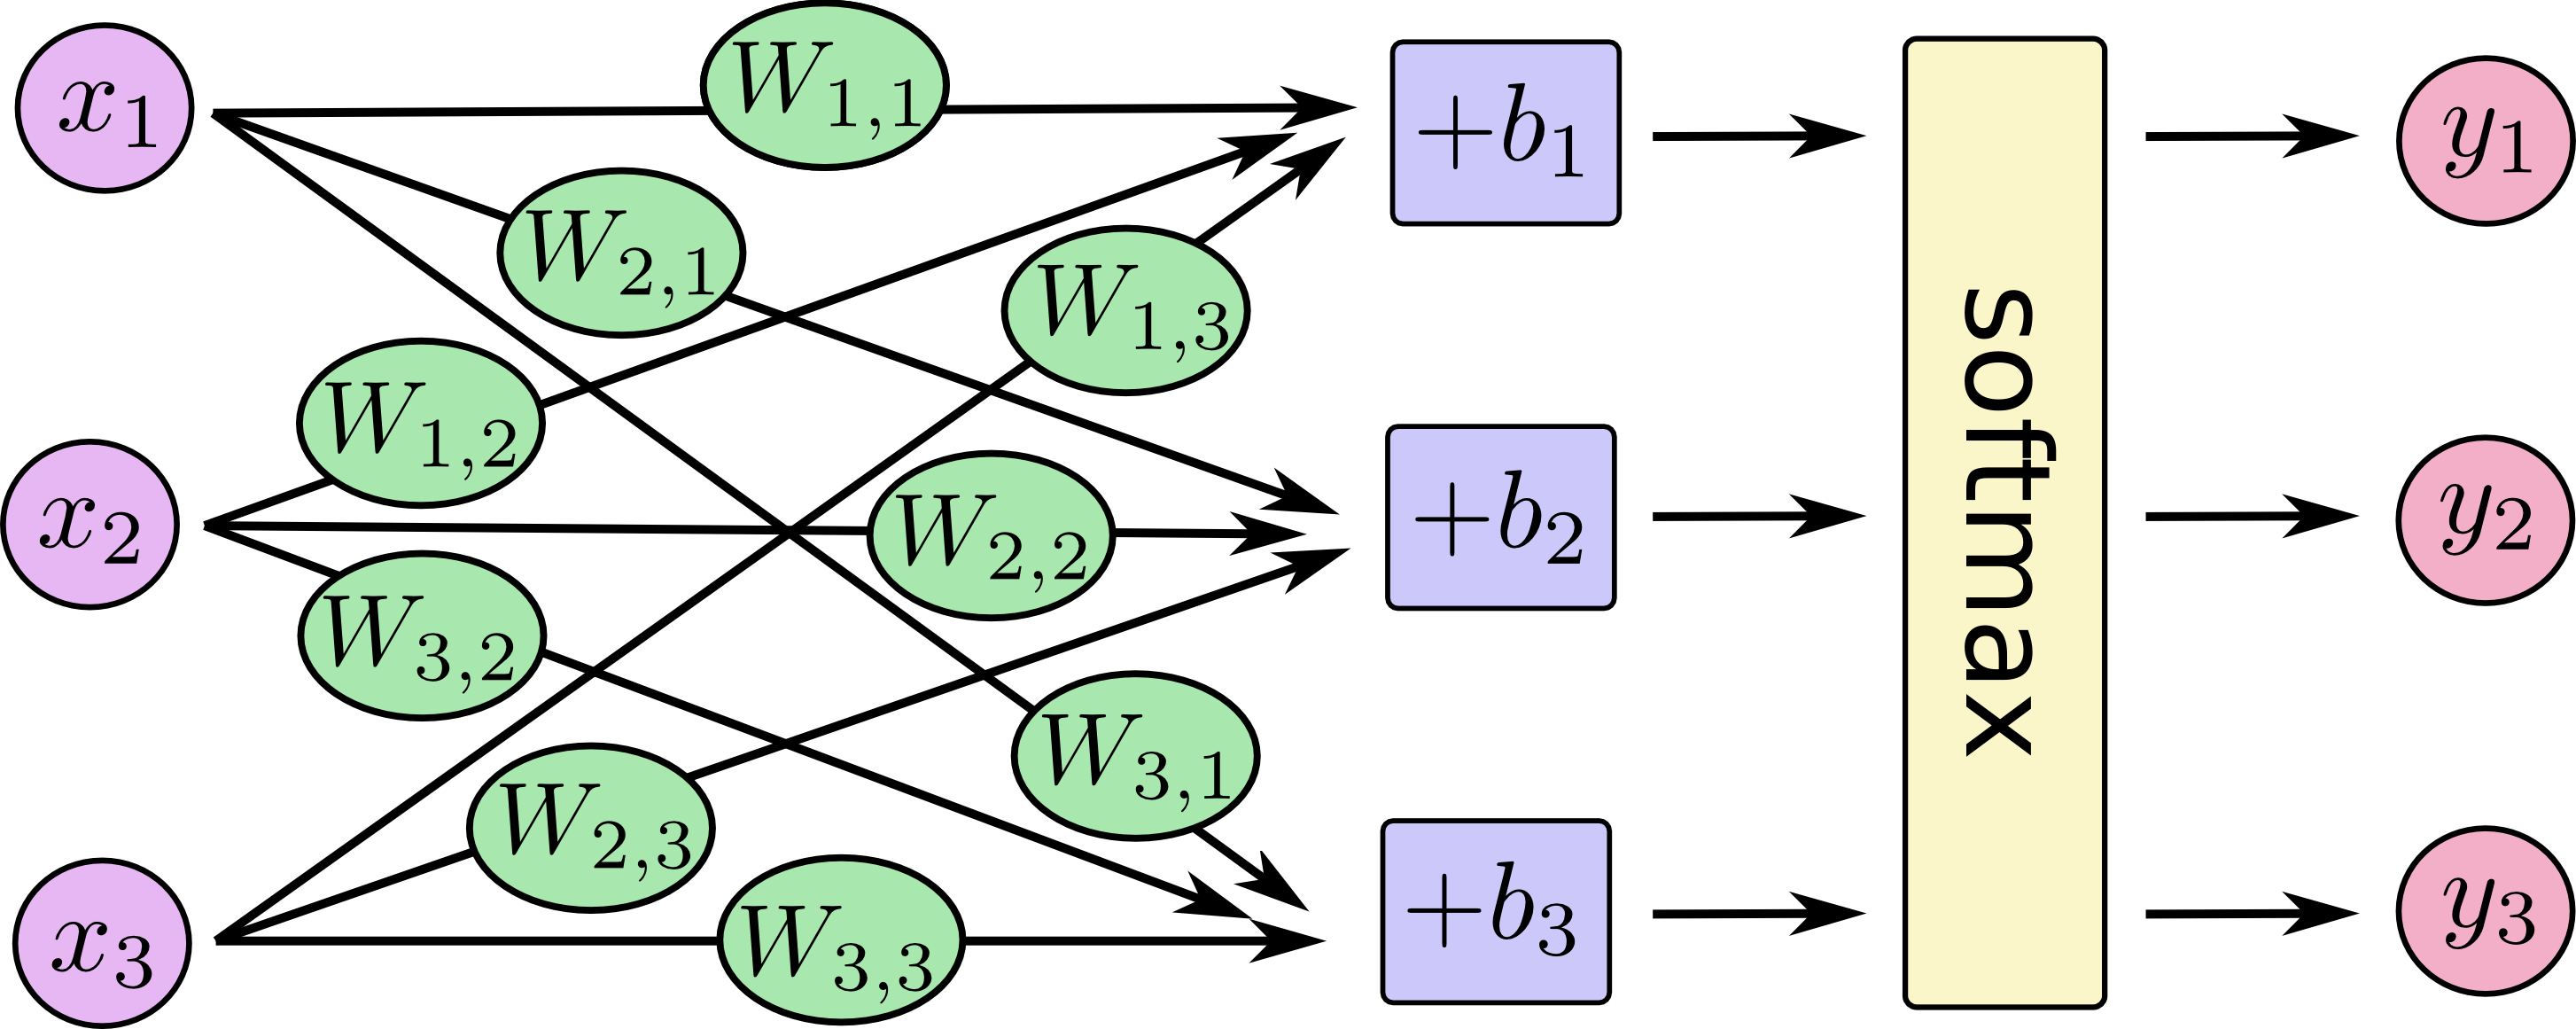
对于给定的输入图片$\boldsymbol{x}$,它代表数字$i$的证据可以表示为
$$ e_i=\sum_{j}{W_{i,j}x_j+b_i} $$
其中$\boldsymbol{W}_i$ 代表权重,$\boldsymbol{b}i$代表数字$i$类的偏置量,$j$代表给定图片$\boldsymbol{x}$的第$j$个像素。 $$ y=\mathrm{softmax}(e_i) $$ 这里的$\mathrm{softmax}$可以看成是一个激励函数,把我们定义的线性函数的输出转换成我们想要的格式,也就是关于10个数字类的概率分布。 $$ \begin{align} y & = \mathrm{softmax}(\boldsymbol{e})=\mathrm{normalize}(\mathrm{exp}(\boldsymbol{e})) \Rightarrow\ y_i&= \mathrm{softmax}(e_i)=\frac{\mathrm{exp}(e_i)}{\sum{j}\mathrm{exp}(e_j)}\Rightarrow\ y&=\mathrm{softmax}(\boldsymbol{W}_i\boldsymbol{x}+\boldsymbol{b}) \end{align} $$ 这个幂运算表示,更大的证据对应假设模型里面更大的乘数权重值。反之,拥有更少的证据意味着在假设模型里面拥有更小的乘数系数。将上述过程表示为图的形式:
TensorFlow实现
-
为输入图像和目标输出类别创建节点,来开始构建计算图。
x = tf.placeholder("float", shape=[None, 784]) y_ = tf.placeholder("float", shape=[None, 10]) -
为模型定义权重$W$和偏置$b$。
W = tf.Variable(tf.zeros([784,10])) b = tf.Variable(tf.zeros([10])) -
初始化变量
sess.run(tf.initialize_all_variables()) -
回归模型计算图
计算每个分类的softmax概率值:
y = tf.nn.softmax(tf.matmul(x,W) + b)为训练过程指定最小化误差用的损失函数(目标类别和预测类别之间的交叉熵):
cross_entropy = -tf.reduce_sum(y_*tf.log(y)) -
训练模型
因为TensorFlow知道整个计算图,它可以使用自动微分法找到对于各个变量的损失的梯度值。TensorFlow有大量内置的优化算法。
train_step = tf.train.GradientDescentOptimizer(0.01).minimize(cross_entropy)往计算图上添加一个新操作,其中包括计算梯度,计算每个参数的步长变化,并且计算出新的参数值。
整个模型的训练可以通过反复地运行train_step来完成。
for i in range(1000):
  batch = mnist.train.next_batch(50)
  train_step.run(feed_dict={x: batch[0], y_: batch[1]})
每一步迭代,我们都会加载50个训练样本,然后执行一次train_step,并通过
feed_dict将x和y_张量占位符用训练训练数据替代。 -
评估模型
correct_prediction = tf.equal(tf.argmax(y,1), tf.argmax(y_,1))
accuracy = tf.reduce_mean(tf.cast(correct_prediction, "float"))
多层卷积网络
深入MNIST
权重初始化:加入少量的噪声来打破对称性以及避免0梯度。
偏置初始化:由于我们使用的是ReLU神经元,因此比较好的做法是用一个较小的正数来初始化偏置项,以避免神经元节点输出恒为0的问题(dead neurons)。
def weight_variable(shape):
  initial = tf.truncated_normal(shape, stddev=0.1)
  return tf.Variable(initial)

def bias_variable(shape):
  initial = tf.constant(0.1, shape=shape)
  return tf.Variable(initial)