虚拟化
VMWare
网络配置
虚拟网络
VMware虚拟网桥
vmnet0:与主机网络连接复用物理接口。
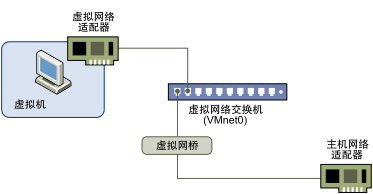
虚拟网桥的物理主机是透明的。在Windows中,无需通过网络管理配置接口的桥接。
==配置自动桥接的主机网络适配器==:可选列表中可能包含了Hyper-V的虚拟适配器,应该取消选择,否则其IP地址与物理网卡地址可能不在同一网段。
vmnet1:Host-Only网络模式,类似于vmnet0但无法访问物理网络。
VMware NAT
vmnet8:宿主机地址为:192.168.xxx.1,虚拟网关/DNS服务器地址为:192.168.xxx.2(见配置文件%PROGRAMDATA%/VMWare/vmnetnat.conf);
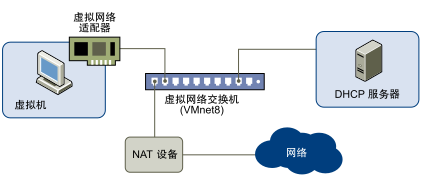
NAT设备:通过网络地址转换为物理机IP地址,由物理网络接口收发数据。
通过vmnetnat.conf可配置入网流量的NAT端口地址映射。
[incomingtcp]
# Use these with care - anyone can enter into your virtual machine through these...
#
# WEB (make sure that if you are using named webhosting, names point to
#   your host, not to guest... And if you are forwarding port other
#   than 80 make sure that your server copes with mismatched port
#   number in Host: header)
#   lynx http://localhost:8888
#8888 = 192.168.27.128:80
[incomingudp]
# UDP port forwarding example
#6000 = 192.168.27.128:6001
完成后重启VMWare NAT服务。在宿主机或其他主机上,可通过宿主机的IP地址和映射后的端口访问虚拟机中开放的服务。==如果防火墙开启,则需要设置一条防火墙入站规则,允许访问主机的目标端口。==
https://www.vmware.com/support/ws3/doc/ws32_network21.html
共享
宿主磁盘文件共享
安装vmware-tools
vmware-tools需要Linux虚拟机安装perl解释器。
在Linux虚拟机中安装vmware-tools时找不到gcc、kernel-headers,需要安装编译工具和依赖库。
yum install gcc binutils make kernel-devel -y
无法在虚拟机中访问已共享的宿主机文件夹。
sudo vi /etc/fstab
# append following content
# .host:/     /mnt/hgfs    fuse.vmhgfs-fuse  allow_other    0    0
显示
虚拟机屏幕尺寸
问题:虚拟机不能自适应屏幕尺寸。
The issue is that
libresolutionKMS.sois not loaded into the Wayland session on Fedora. It works as expected in Ubuntu 20.10 with either Wayland or Xorg.
cp /etc/vmware-tools/tools.conf.example /etc/vmware-tools/tools.conf
nano /etc/vmware-tools/tools.conf
Remove the # from this block:
[resolutionKMS]
enable=true
systemctl restart vmtoolsd.service
移动和复制虚拟机
当移动或复制虚拟机后,VMWare会提示用户查虚拟机磁盘文件(对应虚拟机配置文件中的scsi0:0.fileName),并在虚拟机配置文件.vmx中增加一个搜索路径fileSearchPath;当再次复制或移动上述虚拟机,如果仍在本机上,由于fileSearchPath存在,将直接访问该路径下的虚拟磁盘文件,而非复制到当前虚拟机目录下的虚拟磁盘文件。因此需要修改或删除该搜索路径。
虚拟机快照
删除快照:每个快照会在磁盘上额外生成一个较小的虚拟磁盘文件;删除快照将删除该文件。可删除某些不再使用的快照以节约存储空间。
Window Sub-system of Linux (WSL)
安装
自动安装
自动安装WSL需要的系统组件、Linux内核并安装默认的Linux发行版(默认为Ubuntu)1。
版本要求:Windows 10 2004+(Build 19041+) or Windows 11。
wsl --set-default-version 2    # 安装保证WSL2已经启用
wsl --install                  # 安装默认发行版
wsl --update                   # 升级至应用商店版本(或通过应用商店升级)
wsl --version                  # 商店版本可用
手动安装
启用WSL2:
dism.exe /online /enable-feature /featurename:Microsoft-Windows-Subsystem-Linux /all /norestart
dism.exe /online /enable-feature /featurename:VirtualMachinePlatform /all /norestart
# Restart before updating to WSL 2
- 下载Linux内核更新包:WSL2 Linux kernel update package for x64 machines。
设置WSL2,WSL2需要开启Hyper-V。
wsl --set-default-version 2     # 更改默认安装的版本 (WSL2)
wsl --set-version <dist-name> 2 # 转换已安装的版本 (WSL2)
安装管理发行版
从应用商店查找安装Linux发行版。发行版管理:
wsl --set-default <dist-name>  # 设置默认发行版
wsl --install -d <DistroName>  # 安装一个发行版
wsl --list [--all|--running] [--quiet|--verbose] # 列出系统中的发行版
离线安装
如果联网安装下载发行版很慢,或者机器离线,则在开启系统的WSL组件后可以离线下载并手动安装WSL发行版。如果应用商店不可用,则从appx文件(zip)中提取安装内容(解压其中的Ubuntu_2004_*.appx到安装位置,同级目录下还包含不同缩放比例下的图标资源文件,解压到安装目录下的Assets目录中),并手动执行安装(运行ubuntu.exe)。
配置WindowsTerminal:由于是手动安装,需要修改启动目录(否则找不到路径无法启动,可设置为WSL用户主目录\\wsl$\Ubuntu\home\gary)和资源图标文件(任意图片文件,可使用安装自带的图标$INSTALLPATH\Assets\StoreLogo.scale-100.png)。
开启systemd
编辑/etc/wsl.conf,重启WSL。(需要WSL版本为0.67.6及以上)
[boot]
systemd=true
WSL系统配置
忘记密码
# windows CLI
ubuntu config --default-user root
# login WSL with root
passwd <username>
# windows terminal
ubuntu config --default-user <username>
其他发行版,将
ubunut替换为其他发行版名称。
网络配置
WSL端口转发
Advanced settings configuration in WSL | Microsoft Docs。
使用WSL
启动和停止WSL
wsl --user root  # 以指定用户身份运行
wsl --exec cmd   # 不启动shell运行命令
wsl --distribution,-d <distname>  # 运行指定发行版
wsl --shutdown                 # 终止所有正在运行WSL2实例
wsl --terminate  <dist-name>   # -t, 终止指定发行版
Windows下执行WSL命令
不启动WSL终端,直接运行命令:
wsl [wsl_opts] -- [linux_args]
# wsl -- ip a '|' grep -E 'inet.*eth0'
文件共享
本地磁盘位于/mnt目录下,例如C盘位于/mnt/c。
文件权限:WSL挂载的Windows目录权限均为777(WSL也不能改动该目录中的内容的权限),代表WSL未对该目录做任何权限控制,其实际权限由Windows文件系统决定。
某些应用要令其某些文件的权限为特定值,如果设置失败会产生异常。
开发环境
Visual Studio Code server:在WSL中运行code便可以从Windows中启动VS Code Remote Extension连接至WSL。
QEMU
QEMU目前支持模拟的架构包括ARM、CRIS、i386、M68k (ColdFire)、MicroBlaze、MIPS、PowerPC、SH4、SPARC和x86-64。
In system emulation mode QEMU emulates a full system, including a processor and various peripherals.
In user mode, QEMU can launch Linux processes compiled for one CPU on another CPU.
安装
Linux/apt
QEMU包含多个架构的模拟功能,而用户通常不会使用到所有架构,因此只需要安装对应架构的包qemu-system-ARCH。如果要使用用户模式模拟,则安装qemu-user或qemu-user-static。
sudo apt install qemu-system     # full installation
sudo apt install qemu-system-arm # only specific architecture
sudo apt install qemu-system-gui qemu-utils ipxe-qemu \
                 qemu-efi-aarch64 qemu-efi-arm
qemu-system包含以下架构的包:arm, mips, ppc, sparc, x86, s390x, misc。
qemu-system-arm支持aarch64(64位)和arm(32位)架构。
qemu-system-x86支持x86_64(64位)和i386(32位)架构。
qemu-kvm在(x86机器)KVM模式下运行qemu-system-x86(后向兼容);qemu-system-x86-microvm裁剪了大量功能提供轻量容器用于KVM隔离(常规用途使用qemu-system-x86);qemu-system-x86-xen:run Xen in HVM mode.
qemu-system-gui提供(GTK)图形界面。
qemu-utils提供虚拟磁盘镜像工具、网络磁盘访问等工具。
qemu-efi-aarch64提供BIOS固件,支持包含安全启动的UEFI。
安装管理工具
sudo apt install libvirt-daemon-system libvirt-clients bridge-utils
sudo apt install virt-manager
Libvirt is a C toolkit to interact with the virtualization capabilities of recent versions of Linux (and other OSes). The library aims at providing a long term stable C API for different virtualization mechanisms. It currently supports QEMU, KVM, XEN, OpenVZ, LXC, and VirtualBox.
libvirt-daemon-systemcontains the configuration files to run thelibvirtdaemon as a system service.libvirt-clientscontains the libvirt shellvirshand other client binaries.bridge-utilscontains utilities for configuring the Linux Ethernet bridge in Linux.
virt-managerpresents a summary view of running domains and their live performance & resource utilization statistics. A detailed view presents graphs showing performance & utilization over time. Ultimately it will allow creation of new domains, and configuration & adjustment of a domain's resource allocation & virtual hardware. Finally an embedded VNC client viewer presents a full graphical console to the guest domain.
创建虚拟机
创建磁盘镜像:
qemu-img create --format "raw|qcow2" arm64linux.img 40G
创建虚拟机:
qemu-system-aarch64.exe \
  -M virt \
	-bios QEMU_EFI.fd \
	-cpu cortex-a72 -smp 4,cores=4,threads=1,sockets=1 \
	-m 8192 \
	-netdev tap,id=mynet0,ifname=tap1 \
  -device e1000,netdev=mynet0,mac=52:55:00:d1:55:01 \
	-device nec-usb-xhci \
	-device usb-kbd \
	-device usb-mouse \
	-device VGA \
	-device virtio-scsi-device \
	-device virtio-blk-device,drive=hd0 \
	-drive if=none,file=arm64linux.img,id=hd0 \
	-device scsi-cd,drive=cdrom \
	-drive if=none,file=Kylin-Server-10-SP1-Release-Build04-20200711-arm64.iso,id=cdrom,media=cdrom
启动虚拟机时,无需再指定CD驱动器设备;可重新指定虚拟网卡(tap)。
虚拟机网络配置
需要为虚拟机添加虚拟网络设备,否则虚拟机启动后无法与宿主机进行通信,仅能通过QEMU提供的终端操作虚拟机。创建虚拟机时指定以下选项以创建虚拟网络设备:
-netdev tap,id=mynet0,ifname=tap1 # 指定虚拟网络设备类型、名称和ID
-device e1000,netdev=mynet0       # 指定虚拟机网络设备对应的虚拟网络设备
-device还可添加附加参数:mac=52:55:00:d1:55:01。
创建Windows Tap网络接口
- 在Windows主机上安装TAP网卡驱动:可下载openvpn客户端软件,只安装其中的TAP驱动;在网络连接中,会看到一个新的虚拟网卡,属性类似于
TAP-Windows Adapter V9,将其名称修改为tap0。 - 将虚拟网卡和Windows上真实网卡桥接:选中这两块网卡并桥接生成网桥。==生成的网桥将使用所选的第一个设备的物理信息作为外部接口信息==。
创建Linux虚拟网桥和Tap网络接口
以管理员身份运行以下命令,创建虚拟网桥和Tap接口。
ip link add br0 type bridge          # 创建虚拟网桥 => brctl addbr br0
ip addr delete IP/MASK dev eth0      # 删除主机连接的IP => ip addr flush dev eth0
ip link set dev eth0 master br0      # 将主机连接绑定到网桥 => brctl addif br0 eth0
ip addr add IP/MASK dev br0          # 为网桥添加IP地址,或自动分配 dhclient -v br0
ip link set br0 up                   # 启用网桥 => ifconfig br0/tap1/eth0 up
ip route add default via IP dev br0  # 主机通过网桥访问网络

ip tuntap add dev tap1 mode tap      # 创建tap接口
ip link set dev tap0 master br0      # 将tap接口绑定到网桥 => brctl addif br0 tap1
ifconfig,tunctlandbrctlare mostly considered deprecated nowadays.
查看网桥和接口信息:
brctl show               # show bridge information
ip link show qemu_bridge # show link information of bridge
ip link show qemu_tap1   # show link information of tap interface
虚拟网桥通过数据链路层协议(Ethernet)连接物理接口和虚拟接口构成虚拟网络,同时网桥也承载主机的IP协议栈以代替主机原有的网络连接(eth0)提供主机的网络服务。
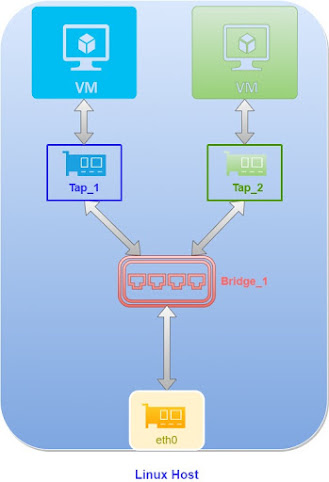
Tap网络接口则通过虚拟网桥复用物理接口:网桥从主机的上层协议接收的数据以及其他Tap接口接收到的外发数据将转发给物理接口,物理接口执行外发操作;对于接收数据,物理接口将数据转发给网桥,网桥根据MAC地址按端口进行转发。(通常,一个物理网卡应该只与一个虚拟网桥连接)