机器学习实践
搭建开发环境
Python环境
数据处理和算法库:
numpy、pandas;scipy、sklearn (scikit-learn)tensorflow、keras(tensorflow已将keras作为内置模块,但使用需要单独安装);pytorch;
安装Tensorflow
tensorflow 1.x分为CPU和GPU版本,且1.x和2.x版本不兼容,因此需要在单独的虚拟环境中分别安装:
conda create -n tf2 [tensorflow-gpu] tensorflow=<ver> cudnn cudatoolkit=11.2 keras
conda create -n tfgpu tensorflow-gpu=<ver> ... # 1.x GPU版本
2.x版本的包名不区分GPU/CPU版本,根据是否安装GPU工具包(
cudnn和cudatoolkit)决定是否能使用GPU计算。tensorflow-gpu声明了对GPU库的依赖保证安装支持GPU的版本。使用
pip安装:pip install tensorflow # CPU 版本
GPU支持
在系统中安装NVIDIA® GPU 驱动程序(CUDA 11.2需要450.80.02或更高版本)。==使用Conda安装tensorflow-gpu将自动为虚拟环境安装兼容版本的CUDA Toolkit和cuDNN==。官方提供CUDA Toolkit包含了进行CUDA相关程序开发的编译、调试等过程相关的所有组件。而Conda虚拟环境提供的CUDA Toolkit仅包含运行时库。以下为可选安装内容:
-
CUDA® 工具包(CUDA Toolkit):TensorFlow 支持 CUDA 11.2(TensorFlow 2.5.0及更高版本)。
-
cuDNN SDK(8.1.0)
-
CUDA 工具包附带的 CUPTI。
export LD_LIBRARY_PATH=$LD_LIBRARY_PATH:/usr/local/cuda/extras/CUPTI/lib64 -
TensorRT 6.0,可缩短用某些模型进行推断的延迟时间并提高吞吐量。
TensorFlow容器
docker run -it -p 8888:8888 tensorflow/tensorflow:latest-jupyter
验证安装
import tensorflow as tf
print(tf.version.VERSION)
tf.config.list_physical_devices()
Tensorflow with DirectML on WSL
安装PyTorch
使用Conda安装pytorch:相关包可使用pytorch通道下载(注意选择操作系统和计算平台,以下仅为示例)。
conda create -n pytorch[-gpu] python=3.8   # python>=3.6
conda install pytorch torchvision torchaudio cpuonly -c pytorch
conda install pytorch="1.10.*"="*cuda*" torchvision torchaudio cudatoolkit=11.3 -c pytorch
2022/01/21:
conda-forge: cudatoolkit<=11.2;pytorch: cudatoolkit<=11.3。当Pytorch和TensorFlow共同安装时,可能导致依赖解析问题无法安装Pytorch的GPU版本,此时可指定安装pytorch-gpu(Linux下才有此包)。使用pip安装
pytorch:pip install torch torchvision torchaudio # CPU version pip3 install torch==1.10.1+cu113 \ torchvision==0.11.2+cu113 torchaudio==0.10.1+cu113 \ -f https://download.pytorch.org/whl/cu113/torch_stable.html # GPU version验证安装:
import torch
x = torch.rand(5, 3); print(x)
torch.cuda.is_available()
Enable PyTorch with DirectML on WSL 2
图神经网络库
DGL
conda create -n dgl -c pytorch pytorch=1.12 cudatoolkit=11.6 cudnn
conda activate dgl
conda install -c dglteam dgl-cuda11.6
dglteam仓库仅在Anaconda官方源中可用,如果使用Nexus代理,增加以下仓库代理。
Name=anaconda-cloud
Remote=https://conda.anaconda.org/
URL=http://192.168.178.52:8081/repository/anaconda-cloud
也可使用DGL提供的pip仓库安装dgl库。
pip install dgl-cu116 dglgo -f https://data.dgl.ai/wheels/repo.html
通过配置文件~/.dgl/config.json 或环境变量指定使用的深度学习框架后端。
{
    "backend":  "pytorch"
}
export DGLBACKEND=pytorch # pytorch, mxnet, tensorflow
PyTorch Geometric
PyG (PyTorch Geometric) is a library built upon PyTorch to easily write and train Graph Neural Networks (GNNs) for a wide range of applications related to structured data.
conda create -n pyg -c pytorch pytorch=1.12 cudatoolkit=11.6 cudnn
conda activate pyg
conda install pyg -c pyg
使用pip安装:
CUDA={cpu|cu102|cu113|cu116}
pip install torch-scatter -f https://data.pyg.org/whl/torch-1.12.0+${CUDA}.html
pip install torch-sparse -f https://data.pyg.org/whl/torch-1.12.0+${CUDA}.html
pip install torch-geometric
cpu | cu102 | cu113 | cu116 | |
|---|---|---|---|---|
| Linux | ✅ | ✅ | ✅ | ✅ |
| Windows | ✅ | ✅ | ✅ | |
| macOS | ✅ |
pyg-team/pytorch_geometric: Graph Neural Network Library for PyTorch (github.com)
GPU计算库
NVIDIA CUDA
安装:./cuda-xxx.run --no-opengl-libs;
如果机器已经安装驱动程序,则安装过程中可跳过驱动程序安装;
修改环境变量使CUDA全局可用;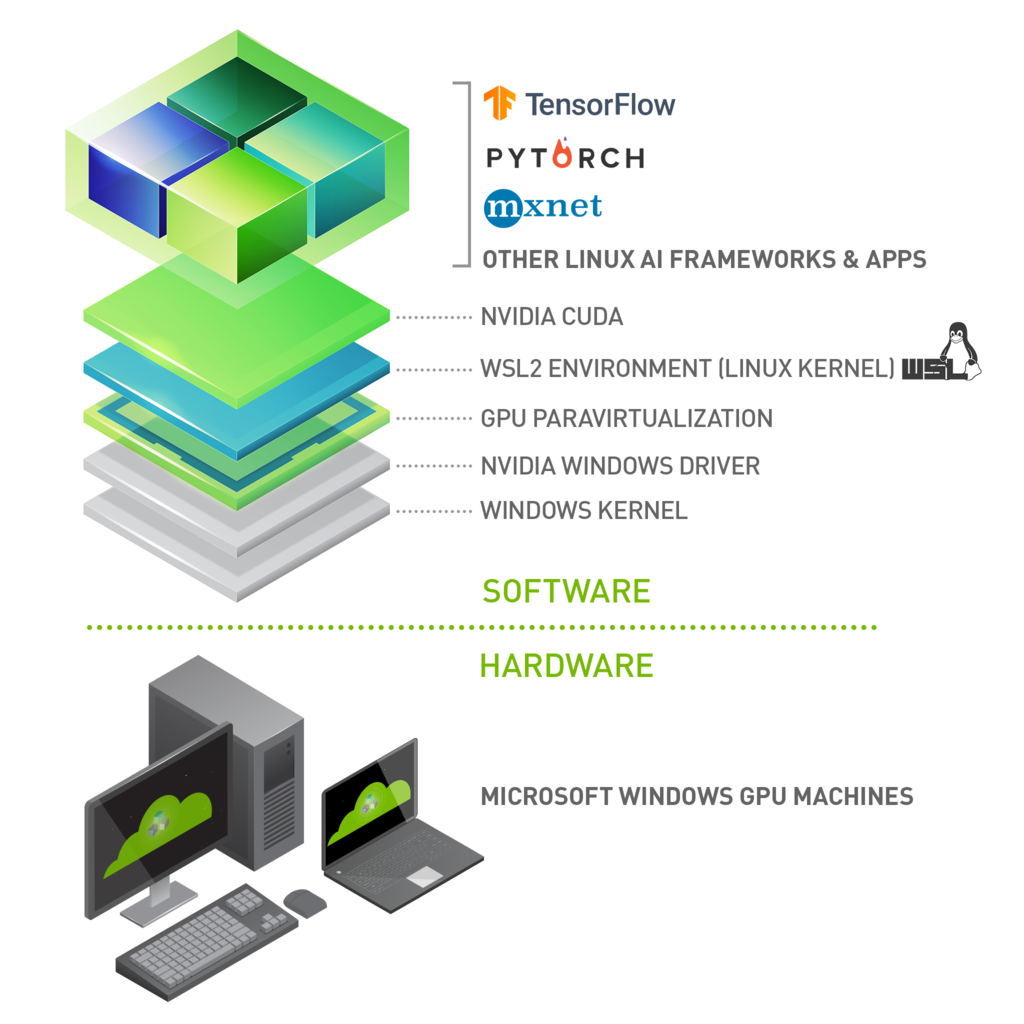
CUDA on WSL 2
系统版本需要为Windows 10 21H2或更高,WSL发行版使用Ubuntu或Debian(Linux 5.10.43.3+)。
-
在Windows中安装支持WSL的NVIDIA CUDA驱动程序。
-
[可选] 在WSL中安装专用CUDA工具包(注意使用
run文件不要安装显卡驱动);如果需要编译CUDA程序,则需要安装CUDA Toolkit。 -
使用CUDA自带样例验证安装是否正确;
-
安装完成后,即可和普通Linux一样使用PyTorch、TensorFlow或NVIDIA Docker。
# 验证
nvidia-smi -q
chmod -R a+w /usr/local/cuda-11.4/samples
cd /usr/local/cuda-11.4/samples/4_Finance/BlackScholes
make BlackScholes && ./BlackScholes
NVIDIA Docker
Note that NVIDIA Container Toolkit has not yet been validated with Docker Desktop WSL 2 backend(实测可以运行).
NVIDIA/nvidia-docker: Build and run Docker containers leveraging NVIDIA GPUs (github.com)
安装NVIDIA Docker工具包:
distribution=$(. /etc/os-release;echo $ID$VERSION_ID)
curl -fsSL https://nvidia.github.io/libnvidia-container/gpgkey | sudo gpg --dearmor -o /usr/share/keyrings/nvidia-container-toolkit-keyring.gpg
curl -s -L https://nvidia.github.io/libnvidia-container/$distribution/libnvidia-container.list | \
sed 's#deb https://#deb [signed-by=/usr/share/keyrings/nvidia-container-toolkit-keyring.gpg] https://#g' | \
sudo tee /etc/apt/sources.list.d/nvidia-container-toolkit.list

sudo apt update && sudo apt install -y nvidia-docker2
需要重启docker服务以完成安装。
容器示例:
docker run --gpus all nvcr.io/nvidia/k8s/cuda-sample:nbody nbody -gpu -benchmark
docker run -it --gpus all -p 8888:8888 tensorflow/tensorflow:latest-gpu-py3-jupyter
docker run --gpus all -it --shm-size=1g --ulimit memlock=-1 --ulimit stack=67108864 nvcr.io/nvidia/tensorflow:20.03-tf2-py3 # Unknown runtime specified nvidia.
Java环境
数据准备
尽管单个向量的默认方向是列向量,但在表示表格数据集的矩阵中, 将每个数据样本作为矩阵中的行向量更为常见。
- 向量:$\mathbf{y}, \boldsymbol{y}$
- 矩阵:$\mathbf{A}, \boldsymbol{A}$
- 张量:$\mathsf{X}$
数据类型
数据集划分
将数据集按比例随机抽样划分为训练集、开发集(交叉验证集)和测试集。
能在开发集上运行性能良好,却在测试集上效果不佳的系统。如果此时开发集和测试集的分布相同,那么你就能清楚地明白问题所在:算法在开发集上过拟合了(overfit)。解决方案显然就是去获取更多的开发集数据。
但是如果开发集和测试集服从不同的分布,解决方案就不那么明确了。此时可能存在以下一种或者多种情况:
- 算法在开发集上过拟合了。
- 测试集比开发集更难进行预测,尽管算法做得足够好了,却很难有进一步的提升空间。
- 测试集不一定更难预测,但它与开发集性质并不相同(分布不同)。因此在开发集上表现良好的算法不一定在测试集上也能够取得出色表现。如果是这种情况,大量针对开发集性能的改进工作将会是徒劳的。
真实数据集
-
keras.datasets提供在线获取(缓存在本地
~/.keras/datasets/)和加载示例数据集的接口。数据集包括:mnist、boston_house、cifar、imdb、reuters等。
数据预处理
- 清理:错误、丢失信息;
- 使用统计方法理解数据;
- 可视化数据,发现有用特征;
- 构造新特征;
- 反复迭代;
数值化(Numeralization)
类别数据(Categorical Variables)
- 无序数据(nominal),例如:
{male, female};不应该被编码为数值,类别之间无大小关系; - 有序数据(ordinal),例如
{low, medium, high};可以编码成任意具有大小关系的数值,不能准确表示原始数据的意图。
One-hot Encoding Scheme
pd_dummy= pd.get_dummies(drop_first=True)
默认仅对object类型的列进行编码。
Dummy Variable Trap
Multicollinearity: Variance Inflation Factor.
https://towardsdatascience.com/one-hot-encoding-multicollinearity-and-the-dummy-variable-trap-b5840be3c41a
Dummy Coding Scheme
Effect Coding Scheme
Bin-counting Scheme
Feature Hashing Scheme
- UNDERSTANDING FEATURE ENGINEERING (PART 2), Categorical Data, Strategies for working with discrete, categorical data, https://towardsdatascience.com/understanding-feature-engineering-part-2-categorical-data-f54324193e63.
- scikit-learn 0.22.1, Preprocessing data, Discretization, https://scikit-learn.org/stable/modules/preprocessing.html#discretization.
Word2vec
利用One-hot Encoding表示单词,使用降维方法减小向量空间。
通俗理解word2vec - 简书 (jianshu.com)
word2vec 中的数学原理详解 - peghoty - 博客园 (cnblogs.com)
标签编码
标签编码,将文本数据转换为整数。
标签二值化,将样本的负/正标签值转换为(0,1)二值。如果标签值类别超过两类,则分别对每类值(视为正样本,映射为1)执行二值化(非正样本映射为0)。
多标签二元化,样本的每个标签对应的编码位置为1。
标准化(Normalization)
Change the values of numeric columns in the dataset to a common scale, without distorting differences in the ranges of values.
每个特征具有的物理意义不同,其具体数值在特征之间通常不具有可比性(更换数据的单位其数值就相应地缩放,但是物理意义没有变化);将数据特征的区间缩放到一个常见的范围,提升算法稳定性。
对于基于距离的算法,则需要考虑:1)原始数据的取值范围(单位)是否影响算法;2)标准化是否破坏了原始的距离信息;
如果一列数据为常量,缩放方法无效;同时,该列数据在学习任务中通常没有作用。
线性缩放
线性缩放处理特征之间数据范围不一致的情形。
标准缩放(StandardScaler)
移除样本的统计均值并将统计方差缩放为1: $$ z = (x-\mu)/\sigma \notag $$
Min-Max缩放
将特征区间缩放到$[0,1]$区间。 $$ \hat{x}=\frac{x-\min{x}}{\max{x}-\min{x}}\notag $$
非线性缩放
对数缩放(LogScaler)*
样本特征分布范围很大(长尾分布),根据特征的属性,如果在特征取值较大,而其变化对目标任务影响较小时(例如收入、数据下载量、音量等),可以采用对数缩放,从而保留更多特征信息。
对数缩放可能使得异常点不显著。
$$ \hat{x}=\log_{10}{(1+x)}\notag $$
可以与线性缩放结合使用。
归一化(Unit Vector Normalization)
针对每个样本而不是每个特征进行处理。
将向量(样本特征向量)长度缩放为1,即将所有样本缩放到一个单位超球面上。需要注意,==如果原始数据本身具有不同的向量长度,且算法对数据的向量长度敏感==(基于距离的算法),则此类标准化方法不适用。此方法常用于文本分类或聚类。 $$ \hat{\boldsymbol{x}}=\frac{\boldsymbol{x}}{|\boldsymbol{x}|}\notag $$
Compare the effect of different scalers on data with outliers。
特征生成
多项式特征生成
基于已有特征生成高阶非线性特征,如:$x^2, x^3, xy, \cdots$。
处理流程
Pipeline
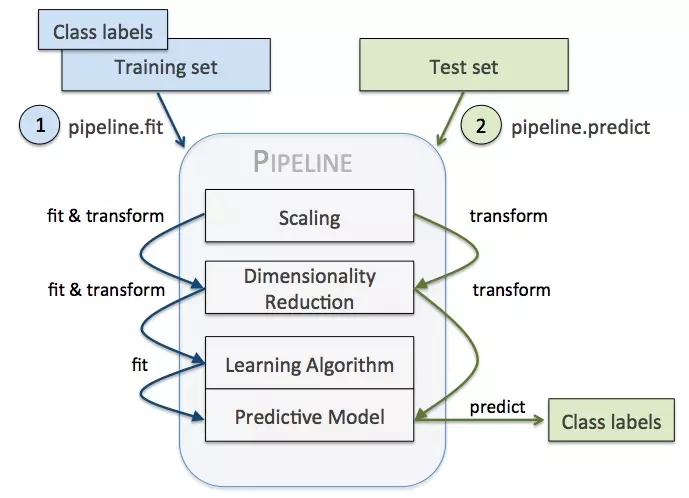
将数据预处理、学习算法等流程串联起来(最后一个流程必须执行预测)。
性能评估
评估方法:
-
学习方法(estimator)的
score方法 -
sklearn.metrics提供的评估预测误差的方法,包括分类误差计算方法:accuracy_score、f1_score、precision_score、recall_score,回归误差计算方法r2_score。 -
交叉验证的评分策略,通过
scoring参数选择评分方法。评分器(scorer)约定越高评分代表越好的性能。预定义的scoring参数对应了metrics中的评估方法。make_scorer自定义打分方法:
def scoring_func(estimator, X, y):
  # do scoring
  return score # higher is better.
多分类或多标签分类的评分方法。
当你需要在多个分类器之间进行选择时,使用单值评估指标将帮助你更快速地作出决定。它能给出一个清晰明了的分类器性能排名,从而帮助团队明确后续的改进方向。
交叉验证
Cross Validation (CV) provides the ability to estimate model performance on unseen data not used while training.
- test on unseen data
- avoid overfitting
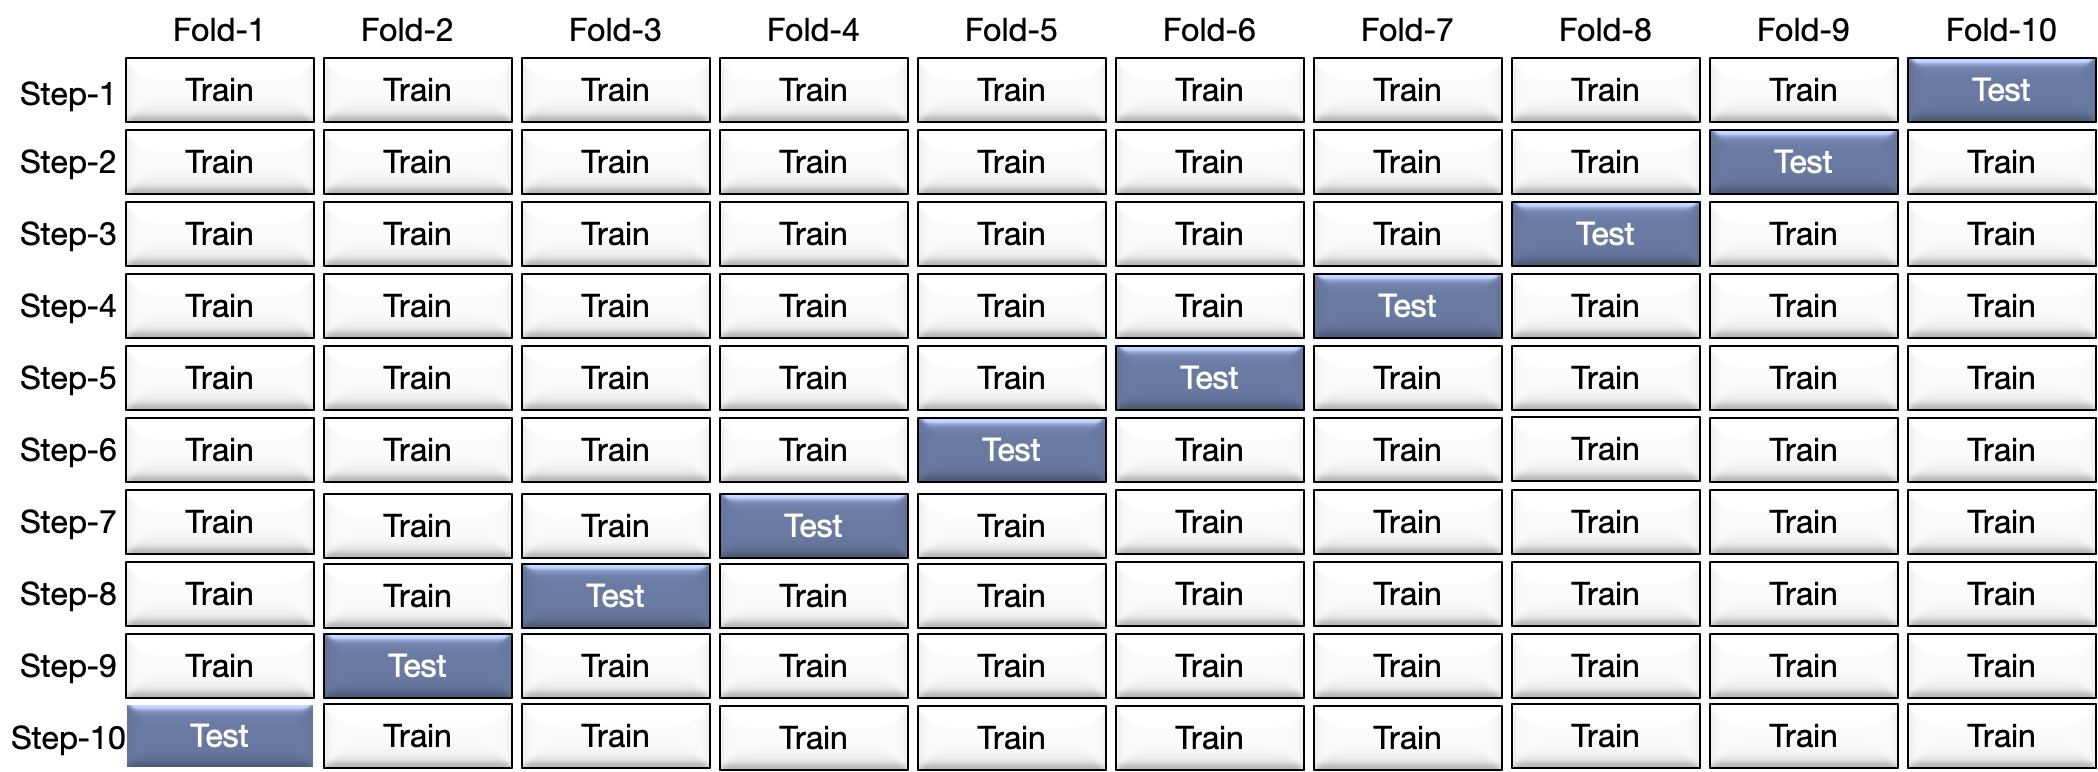
K折交叉验证
步骤:splitting the data into subsets (called folds, K-fold) and rotating the training and validation among them.
https://towardsdatascience.com/what-is-cross-validation-60c01f9d9e75
Metrics and scoring: quantifying the quality of predictions
参数搜索
获取非训练过程调整的你参数。
网格搜索交叉验证
在各个超参数的取值范围内穷举参数组合,分别应用于模型进行训练和预测,根据预测性能获得最佳的超参数组合。为了计算应用超参数组合的模型的性能,需要结合(K折)交叉验证,即将数据集划分为==训练集和验证集==。
Random Search Cross Validation
从参数空间中随机采样。
深度学习算法
AutoEncoder
Building Autoencoders in Keras, 2016
End-to-End ML Lifecycle Management
MLflow
- MLflow Tracking: 记录实验结果,比较参数和结果;
- MLflow Projects:将ML代码打包未可重用可复现的形式(用于共享或生产部署);
- MLflow Models:支持多种机器学习库模型在多种平台上的管理和部署;
- MLflow Registry:提供模型管理协作中心。
Concepts — MLflow 1.24.0 documentation
Tutorials and Examples — MLflow 1.24.0 documentation
Orchestrating Multistep Workflows
conda create -n mlflow -c conda-forge mlflow
pip install mlflow
pip install mlflow[pipelines] # + experimental MLflow Pipelines
pip install mlflow[extras]    # + extra ML libraries and 3rd-party tools
pip install mlflow-skinny     # + lightweight version of MLflow
MLflow requires
condato be on thePATHfor the projects feature.
MLflow Tracking
MLflow Tracking — MLflow 1.24.0 documentation
Tracking API
from mlflow import log_metric, log_param
mlflow.set_tracking_uri("http://YOUR-SERVER:4040")  # 默认为本地文件存储
mlflow.set_experiment("my-experiment") # 实验名,默认为Default
log_param("param1", randint(0, 100))   # 记录输入的参数
log_metric("foo", random() + 2)        # 记录输出的指标
为不同的实验设置不相同的实验名称,从而方便对比实验参数和输出指标。
默认将运行记录写入本地./mlruns目录,可在当前目录下运行mlfllow ui查看其中的运行记录。每个运行记录由唯一的Run ID。
Artifacts包含模型代码、运行环境声明等信息。
MLflow Projects
mlflow run --no-conda project_path -P param1=value1
如果指定--no-conda,则MLflow不会自动创建虚拟环境并安装依赖(MLflow内部会维护虚拟环境列表而不会重复创建),而是使用系统已有环境。
项目声明文件:
name: tutorial           # 项目名称
conda_env: conda.yaml    # 项目使用的虚拟环境配置
entry_points:            # 代码入口信息
  main:                  # 可定义多个入口,按顺序指定(构成处理流程)
    parameters:          # 代码接收的参数
      alpha: {type: float, default: 0.5}
      l1_ratio: {type: float, default: 0.1}
    command: "python train.py {alpha} {l1_ratio}"  # 执行代码的命令
虚拟环境配置文件:
name: tutorial           # 虚拟环境名称(MLflow内部使用,映射conda虚拟环境名称)
channels:                # 使用的软件源通道
  - conda-forge
dependencies:            # 依赖库声明
  - python=3.7
  - pip
  - pip:                 # 需要使用pip安装的依赖库
      - scikit-learn==0.23.2
      - mlflow>=1.0
      - pandas
sklearn
pandas, numpy, and sklearn
MLflow Models
保存模型
mlflow.log_artifacts("output_path")    # 将本地目录中的内容作为模型内容保存
mlflow.sklearn.log_model(lr, "model")  # 将模型对象保存到本地
运行模型
mlflow models serve -m runs:/<RUN_ID>/model --port 5001
根据模型自带的环境声明自动创建Conda虚拟环境并运行模型。模型启动后可以通过REST接口向其发送数据。模型将执行预测并输出结果。
运行模型使用的Python版本必须与创建模型时使用的版本一致(否则pickle无法正常工作)。
运行时检测依赖库
specifying pip requirements using pip_requirements and extra_pip_requirements
Ray
安装
机器学习运行环境架构

-
Ray Train: Scalable Model Training
-
Tune: Scalable Hyperparameter Tuning
-
Serve: Scalable and Programmable Serving
-
RLlib: Industry-Grade Reinforcement Learning
Ray Datasets is designed to load and preprocess data for distributed ML training pipelines.

安装机器学习运行环境
conda create -n ray-ml python=3.10
pip install 'ray[air]'                # 包含机器学习运行环境的所有模块
pip install tqdm                      # tqdm用于显示数据处理进度
pip install fastapi                   # 用于模型部署提供API
pip install xgboost xgboost_ray torch tensorflow
Ray集成的机器学习框架以及其他工具需要独立安装。
数据预处理
加载并拆分数据集,构造训练、验证和测试集。
dataset = ray.data.read_csv("s3://anonymous@air-example-data/breast_cancer.csv")
train_dataset, valid_dataset = dataset.train_test_split(test_size=0.3)
test_dataset = valid_dataset.drop_columns(cols=["target"])
Ray会自动在本地创建一个集群,可通过仪表板查看(
http://127.0.0.1:8265)。
构造预处理器,如标准化等;
from ray.data.preprocessors import StandardScaler
preprocessor = StandardScaler(columns=["mean radius", "mean texture"])
预处理器
预处理处理标准的数据集对象DataSet。预处理器在训练阶段进行拟合(fit_transform)并应用于训练和服务阶段(transform)。
自定义预处理器:
import ray
from pandas import DataFrame
from ray.data.preprocessor import Preprocessor
from ray.data import Dataset
from ray.data.aggregate import Max

class CustomPreprocessor(Preprocessor):
    def _fit(self, dataset: Dataset) -> Preprocessor:
        self.stats_ = dataset.aggregate(Max("value"))
    def _transform_pandas(self, df: DataFrame) -> DataFrame:
        return df * self.stats_["max(value)"]
使用BatchMapper构造无需拟合的预处理
preprocessor = BatchMapper(lambda df: df * 2)
训练模型
选择常用机器学习框架训练模型。此阶段通常需要输入训练和验证数据集以优化模型,防止过拟合。
from ray.air.config import ScalingConfig
from ray.train.xgboost import XGBoostTrainer
trainer = XGBoostTrainer(...)
result = trainer.fit()
print(result.metrics)
超参数调优
from ray import tune
param_space = {"params": {"max_depth": tune.randint(1, 9)}}
metric = "train-logloss"

from ray.tune.tuner import Tuner, TuneConfig
from ray.air.config import RunConfig
tuner = Tuner(trainer,param_space=param_space,tune_config=TuneConfig(**kwargs))
result_grid = tuner.fit()
# Fetch the best result.
best_result = result_grid.get_best_result()
print("Best Result:", best_result)
使用模型进行预测
Checkpoints
Checkpoint对象由训练器、调优器以及预训练模型生成,用于构建模型对象。
批量预测
from ray.train.batch_predictor import BatchPredictor
from ray.train.xgboost import XGBoostPredictor
# You can also create a checkpoint from a trained model using
# `XGBoostCheckpoint.from_model`.
checkpoint = best_result.checkpoint
batch_predictor = BatchPredictor.from_checkpoint(checkpoint, XGBoostPredictor)
predicted_probabilities = batch_predictor.predict(test_dataset)
predicted_probabilities.show()
模型部署
from ray import serve
from fastapi import Request
from ray.serve import PredictorDeployment
from ray.serve.http_adapters import json_request


async def adapter(request: Request):
    content = await request.json()
    print(content)
    return pd.DataFrame.from_dict(content)

serve.start(detached=True)
deployment = PredictorDeployment.options(name="XGBoostService")
deployment.deploy(
    XGBoostPredictor, result.checkpoint, batching_params=False, http_adapter=adapter
)
print(deployment.url)
import requests
sample_input = test_dataset.take(1)
sample_input = dict(sample_input[0])
output = requests.post(deployment.url, json=[sample_input]).json()
print(output)
参考文献
- Nyandwi/machine_learning_complete: A comprehensive machine learning repository containing 30+ notebooks on different concepts, algorithms and techniques. (github.com)
- 规模驱动机器学习发展 (deeplearning-ai.github.io)
- deeplearning-ai/machine-learning-yearning-cn: Machine Learning Yearning 中文版 - 《机器学习训练秘籍》 - Andrew Ng 著 (github.com)